Intelligent Part-Writer Instructions
The Intelligent Part-Writer Applet allows you to design a chord progression, then watch the applet automatically compose the parts. Before you try designing schemes of your own, you should check out the example I have prepared. Since the applet's file chooser always starts with your home directory, and since you probably don't want to clutter up your home directory with XML files, I recommend that you establish a working folder directly under your home directory. A single working directory will suffice for all the applets on this site.
Version 2.0.3 of the Intelligent Part-Writer implements two enhancements relative to the preceding version 2.0.2.
The first enhancement is that the SHA-1 64-bit encrypted Java Signing Certificate has been upgraded to 128-bit
SHA-2 encryption, as required by the latest browsers.
The second enhancement is the establishment of an XML schema document, part-writer.xsd.
The version 2.0.3 file chooser now verifies that each compliant XML input file has a document element named
“document” with a schemaLocation attribute set to “https://charlesames.net/part-writer part-writer.xsd”.
If you wish to understand what is needed to bring a pre-2.0.3 file into compliance, use an online XML validation site such
as www.freeformatter.com.
Loading the Example
The first prepared example is defined in the file Partwriter-Example.xml.
Follow the instructions given in here to download Partwriter-Example.xml into a working folder under your home directory.
Initially, the applet should resemble Figure 1.
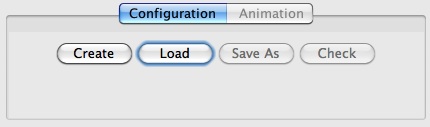
Figure 1: The applet without a file.
To load the file, click on ![]() and use the file chooser to locate
and use the file chooser to locate Partwriter-Example.xml
in its download directory.
Once the file is successfully loaded, the applet will display the file path and the topmost component of the configuration scheme.
This new display is shown in Figure 2.
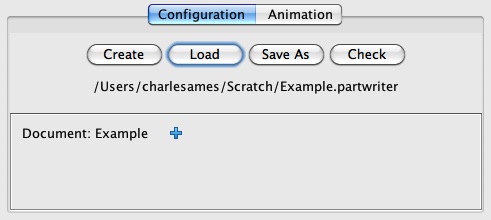
Figure 2: The applet after
Partwriter-Example.xml has been loaded.
Viewing the Configuration
This portion of the instructions explains how to view the components of an Intelligent Part-Writer file. If you have loaded the prepared example and simply wish to experience the demonstration, you may skip ahead to Running the Example.
We will now tour the graphical editor. Notice that this editor provides no Save or Undo buttons; any changes you make are written directly to the underlying file. That's the bad news. The good news is that if you inadvertently shut down the applet by browsing to another window, you can reload the file you were working on without losing data. You will be called upon to run this example shortly, so don't change any data for the moment.
Document Attributes
To the right of the Document: Example component is a show-content icon ( ).
Clicking on this icon reveals the child items shown in Figure 3.
Notice that the show/expand icon toggles to a hide/collapse icon (
).
Clicking on this icon reveals the child items shown in Figure 3.
Notice that the show/expand icon toggles to a hide/collapse icon ( ).
).
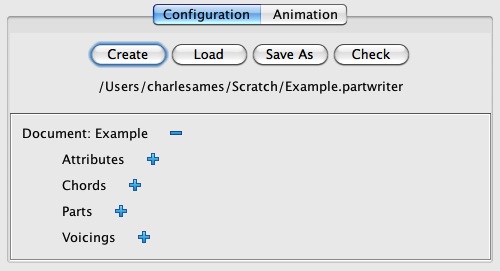
Figure 3: Expanding the Example component reveals four child items.
Expand Attributes by clicking on the item's icon.
This action reveals the document-attribute editing panel pictured in Figure 4.
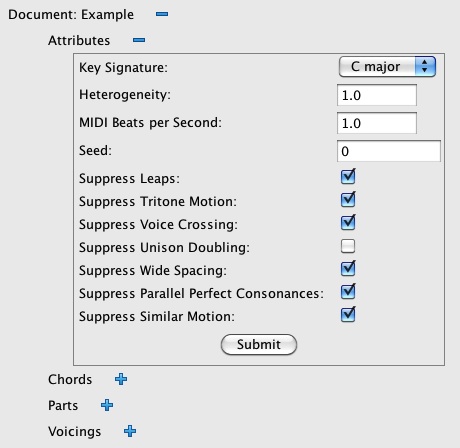
Figure 4: Expanding the Attributes component reveals an attribute-editing panel.
Attribute panels are the exception to the practice of saving changes immediately to file.
Within any attribute panel, you make whatever attribute changes you wish and then click on  .
The editor checks your choices.
Only if it agrees with these choices does the editor save the changed attribute values to file.
.
The editor checks your choices.
Only if it agrees with these choices does the editor save the changed attribute values to file.
The document attributes include:
- Key Signature — The key signature will be shown at the beginning of each part, it also determines which pitches receive explicit accidentals. Selecting a key signature imposes no restrictions on the chords defined in the document, or how they progress.
- Heterogeneity — This value controls the amount of random leavening introduced into the pitch-selection process. More poetically, it measures the bluntness of the knife-edge. When Heterogeneity is small, randomness intervenes only when available options would otherwise affect balance equally. Larger values permit selections to stray from optimal balance; however, the process makes up for such indiscretion in subsequent decisions.
- MIDI Beats per Second — The tempo, expressed in quarter notes per second if the duration unit is treated as a quarter note.
- Seed — Each seed value causes the random number generator to produce a different sequence of random values. If you run an example twice with the same seed — everything else held equal — you'll get the same results.
The remaining items are check boxes which engage/disengage constraints. These various constraints are explained in the topic page.
Chords
Continue your tour by hiding () the attributes panel,
then expanding () the Chords collection.
The editor should now appear as pictured in Figure 5.
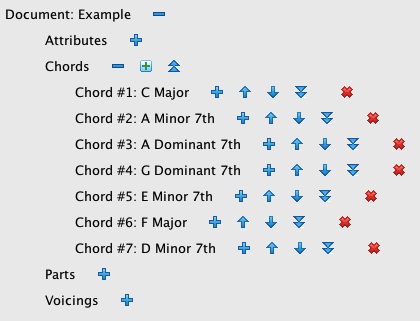
Figure 5: Expanding the Chords collection reveals a list of Chord items.
Six new control icons are revealed in Figure 5:
- Add new item.
- Resequence items.
- Shift item up.
- Shift item down.
- Push items down.
- Delete item.
Were just looking right now, so don't touch ANY of these. Instead, click on for Chord #1: C Major.
Next, click on for both the Attributes and Tones items.
The editor should now appear as pictured in Figure 6.
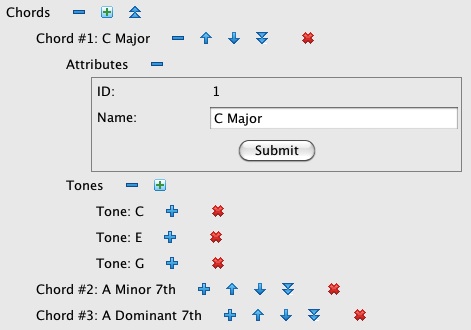
Figure 6: Each Chord item has an Attributes panel and a collection of Tone items.
Tones
Expand Tone: C and its Attributes panel. The editor should now appear as pictured in Figure 7.
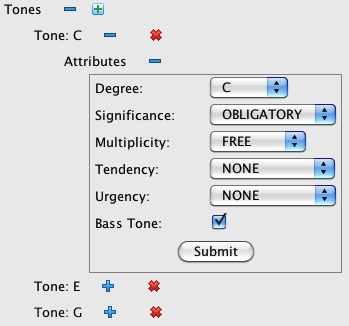
Figure 7: A Tone item with its Attributes panel.
The attributes of a Tone are explained elsewhere.
Collapse () the Chords collection.
Parts
Continue the tour by expanding () the Parts collection.
There are 4 Parts numbered from 1 to 4.
Click on for Part #1: Soprano and then click on
for the Attributes component under Part #1.
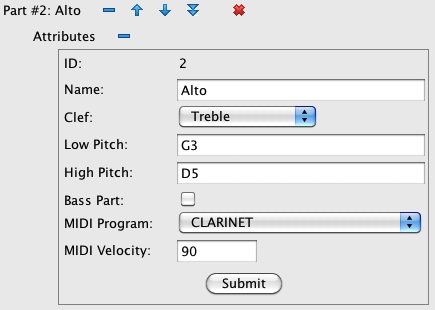
The editor should now appear as pictured in Figure 8.
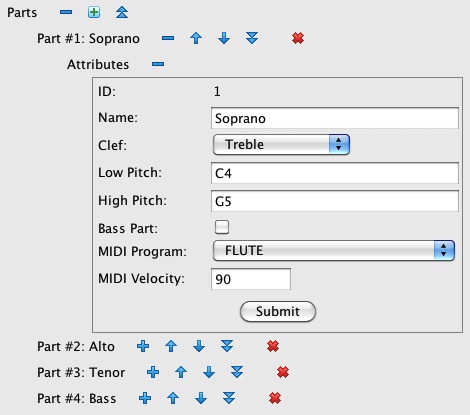
Figure 8: The Part #1: Soprano item with its Attributes panel.
The Clef drop down at the top of the attributes panel in Figure 8 indicates that Part #1 will be notated using the treble clef. The part will range from C4 (middle C) to G5 (an octave and a fifth higher than middle C). Part #1 will not play the bass line; indeed, only the highest-numbered part may have the Bass checkbox selected. Part #1 will be realized aurally using a General Midi flute with MIDI velocity 90 (forte).
Notice you do NOT have control over the MIDI channel. The applet assigns MIDI channels dynamically to MIDI programs, so that two sounds with the same program will be played using the same channel. Since channel #10 is reserved for percussion, no more than 15 different MIDI programs may be selected. However any number of Parts may share the same program.
Peruse the other parts if you wish, then continue the tour by collapsing () the Parts collection.
Voicings
Expanding () the Voicings collection.
There are 9 Voicings numbered from 1 to 9.
Click on for Voicing #2: A Minor 7th and then click on
for the Attributes component under Voicing #2.
The editor should now appear as pictured in Figure 9.
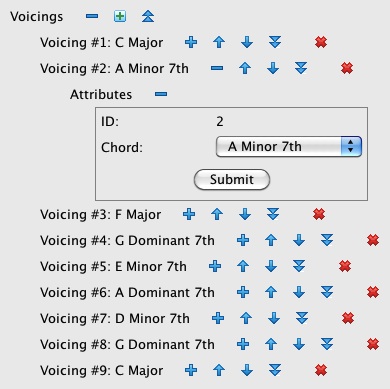
Figure 9: Expanding the Voicings collection reveals the list of Voicing items.
Voicing components have two attributes, ID and Chord. All voicings last for one beat where the tempo is controlled by the document's MIDI Beats per Second attribute. The first voicing starts at time zero; after that, each voicing begins where the previous voicing leaves off.
This completes your tour. Please hide everything but the top-level Document.
Running the Example
The viewer/editor toured in the previous section is embedded within the first
of two tabbed panels named Configuration and Animation.
The Animation panel was initially grayed out (see Figure 1)
but came active immediately after Partwriter-Example.xml was loaded (see Figure 2).
However, the Animation panel only became active because the applet verified
that all the components in Partwriter-Example.xml were properly defined.
Now is the time to click on the tab named Animation.
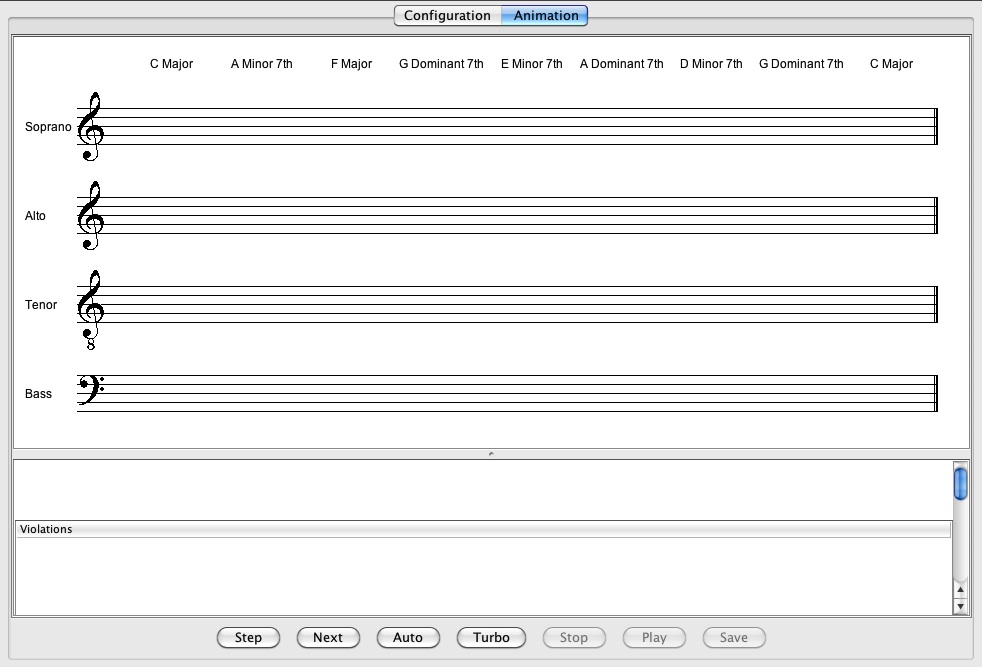
Figure 10: The initial Animation panel for
Partwriter-Example.xml.
The Animation panel pictured in Figure 10 splits into an upper panel showing the parts and a lower panel showing the current status. Beneath the status panel lie seven buttons. The first five of these buttons control the animation:
| Evaluate the next pitch option. | |
| Complete selecting pitches for the current Voicing. | |
| Complete the entire voice-leading exercise at a liesurely rate. | |
| Complete the entire voice-leading exercise at a rapid rate. | |
| Interrupt auto-selection. |
The goal of the animation is to choose a pitch for each Part under each Voicing.
Clicking on ![]() displays individual pitches as they are being considered.
Choices will vary depending on the Seed and Heterogeneity settings in the document attributes panel
(Figure 4). Figure 11 shows what the applet presents to me after clicking once
on
displays individual pitches as they are being considered.
Choices will vary depending on the Seed and Heterogeneity settings in the document attributes panel
(Figure 4). Figure 11 shows what the applet presents to me after clicking once
on ![]() .
.
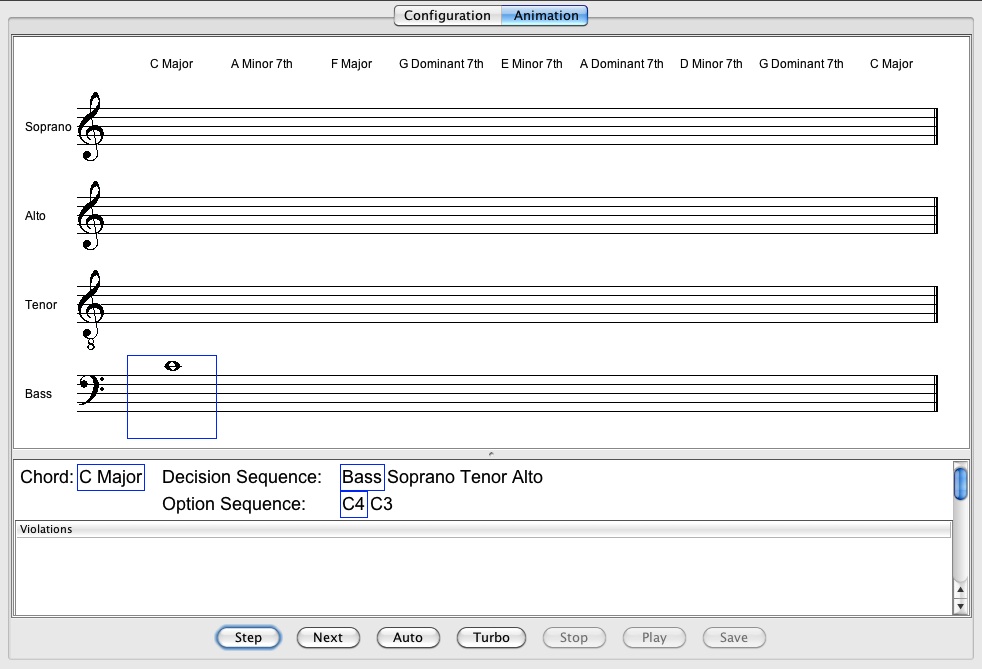
Figure 11: Evaluating the first pitch for the Bass part under Voicing #1.
The blue box around the middle C under “C Major” in the bottom staff of Figure 11 indicates that the part-writer is presently considering middle C for the Bass part for Voicing #1.
The status panel in Figure 11 informs us that the part-writer has elected to compose the parts for Voicing #1 in the sequence Bass, Soprano, Tenor, Alto. The blue rectangle surrounding the name Bass verifies that this is the part it is currently working on. The Option Sequence tells us that that the part-writer has elected to consider first C4 (middle C), next and finally C3 (viola C), as options for the Bass part of Voicing #1. Since there is no particular reason favoring either pitch over the other, the pitch sequence is random. Since the list of Violations for C4 is empty, the part-writer may freely advance to the Soprano part.
Clicking once again on ![]() produces the display panel shown in Figure 12.
produces the display panel shown in Figure 12.
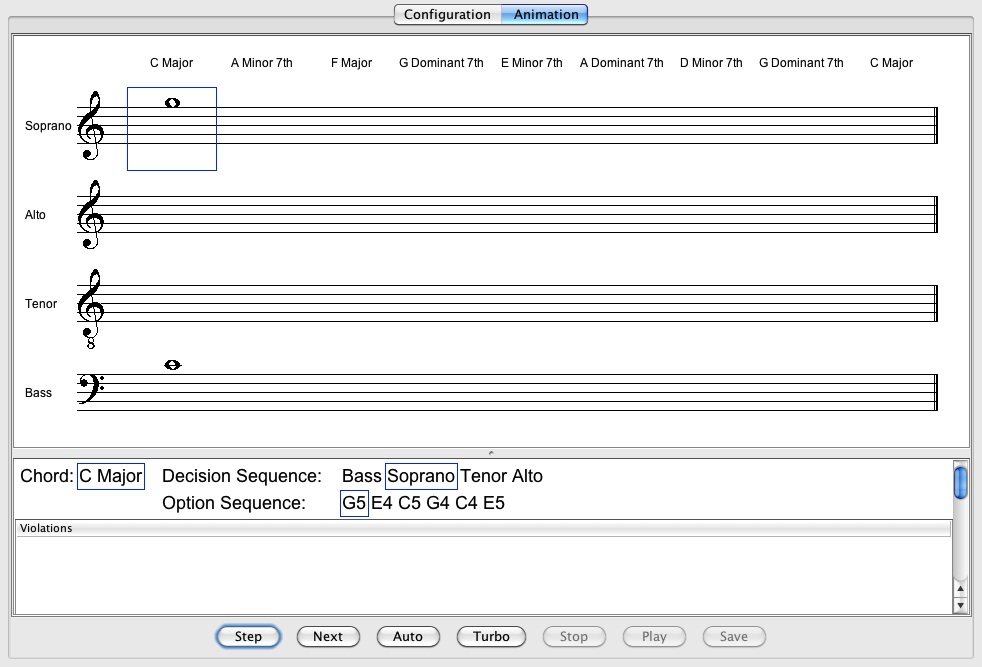
Figure 12: Evaluating the first pitch for the Soprano part under Voicing #1.
The blue box around the G5 under “C Major” in the top staff of Figure 12 now indicates that the part-writer is considering G5 for the Soprano part for Voicing #1.
The status panel in Figure 12 confirms that the part-writer is working on the Soprano part. Here the available options embrace all pitches from the “C Major” chord in the Soprano range as indicated in Figure 8. The Option Sequence tells us that that the part-writer has elected to evaluate these pitches in the sequence G5 E4 C5 G4 C4 E5. Since the list of Violations for G5 is empty, the part-writer may freely advance to the Tenor part.
Stepping forward twice brings me to the first Alto option, which happens to be G4. Notice also that the Violations table now contains an item named “Illegal Doubling”. Click on the “Illegal Doubling” item. The display panel should now appear as in Figure 13.
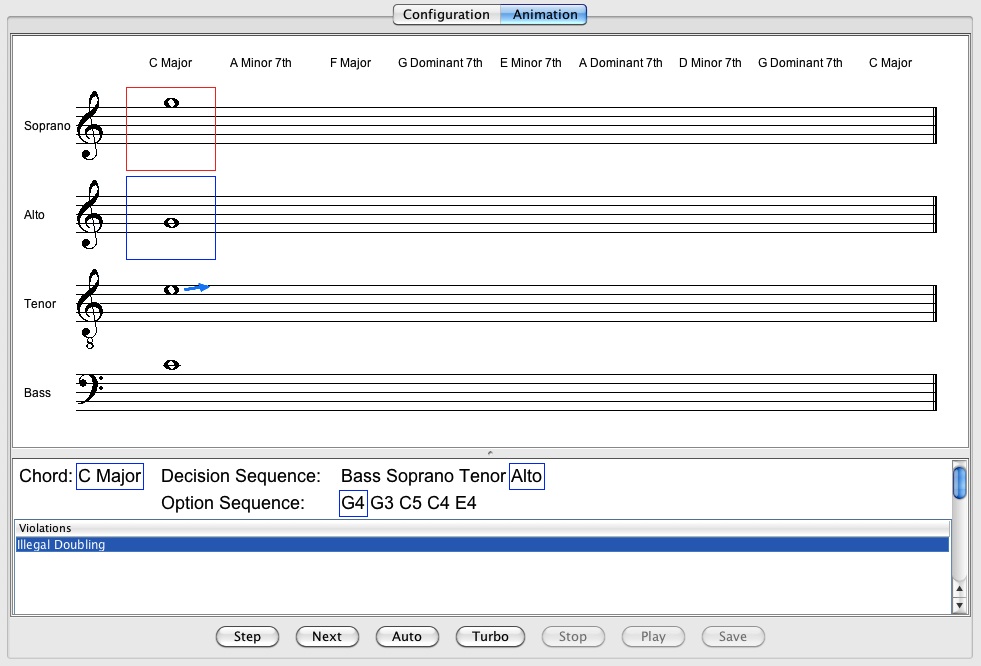
Figure 13: The first pitch (G4) for Alto under Voicing #1 creates an “Illegal Doubling” violation.
Clicking on the “Illegal Doubling” Violation causes the applet to draw rectangular borders around all contributing pitches. The blue border identifies the pitch currently under consideration — a choice which the part-writing engine has already rejected owing to the presence of a violation. The red border identifies the pitch which the engine blames for the violation. (Pink borders identify other contributing pitches.) Had the engine chosen, say, C5 for the Soprano, G4 would have been acceptable here in the Alto.
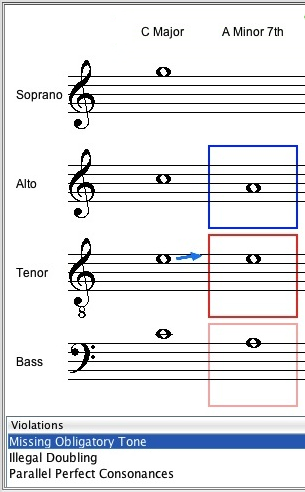
Stepping along into the next voicing brings me to the multiple violations shown in Figure 14.
 |
 |
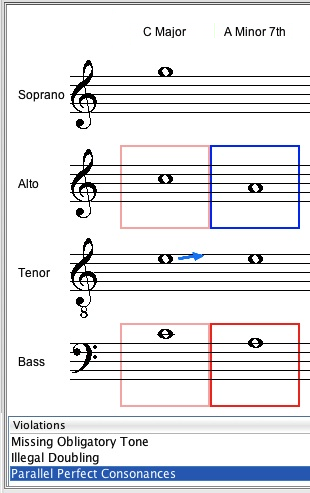 |
Figure 14: Choosing A4 for the Alto in the A Minor 7th voicing causes three Violations.
Of the three Violations pictured in Figure 14:
- “Missing Obligatory Tone” objects that the A Minor 7th voicing is short of two tones for which the Chord specifies OBLIGATORY Significance: C and G. Since only one unselected part remains in the voicing, it will possible to represent both. The violation blames the Tenor, which tone has OPTIONAL Significance
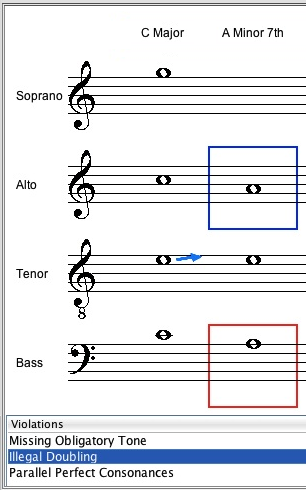
- “Illegal Doubling” objects that the tone A, for which the Chord specifies SINGLE Multiplicity. The violation blames the Bass, which doubles the tone A.
- “Parallel Perfect Consonances” objects that the intervals between Alto and Bass is a perfect octave (C4 C5) in the C Major voicing and also a perfect octave (A4 A4) in the C Minor 7th voicing. The violation blames the Bass.
The three Violations pictured in Figure 14 between each other blame the Tenor and Bass parts in the same voicing. You need to take my word that the decision sequence for the A Minor 7th voicing was Tenor, Bass, Alto, Soprano. Thus source of conflict for backtracking purposes is the Tenor, which is earliest of the blamed decisions
At this point I clicked on ![]() to set loose the remainder of the part-writing run.
The animation is fun to watch as it gropes it's way forward, only to backtrack when confronted by impasses.
The completed display appears in Figure 15.
to set loose the remainder of the part-writing run.
The animation is fun to watch as it gropes it's way forward, only to backtrack when confronted by impasses.
The completed display appears in Figure 15.

Figure 15: Graphic display for the
Partwriter-Example.xml example after the
voice-leading run has completed.
Notice that the animation-controlling buttons are all grayed out but that two other buttons have now come active:
Click on ![]() to hear a MIDI rendition of the example.
Click on
to hear a MIDI rendition of the example.
Click on ![]() to save a MIDI rendition of the example to a file named
to save a MIDI rendition of the example to a file named Example.midi.
To clear the display panel and re-experience the same solution, toggle back and forth between the Configuration and Animation tabs. To obtain a different solution, you must change the Seed value in the document Attributes panel.
Building the Example
This portion of the instructions explains how to create the Partwriter-Example.xml example from scratch.
This is the same example explained on the topic page.
You need to read that explanation before you undertake the procedures described here.
It will be helpful, but not required, to have read Viewing the Configuration.
Make sure you're viewing the Configuration panel.
To create a new file, click on ![]() .
Use the file chooser to locate your working directory and name the file
.
Use the file chooser to locate your working directory and name the file Partwriter-Example.xml.
If a file with the same name already exists, overwrite it. (You can always re-download the original.)
The editor should now resemble Figure 15.
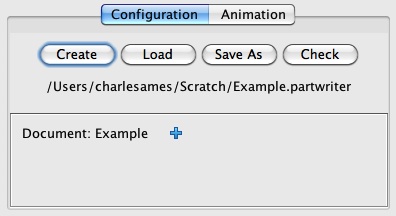
Figure 15: The newly created
Partwriter-Example.xml example.
Document Attributes
Notice the icon, located just right of the Example component.
This is the show/expand icon. Click on it.
The editor should now resemble Figure 16.
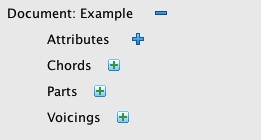
Figure 16: Components of the Example item.
The first thing to do is select document attributes.
To reveal the document attributes panel, click on the the show/expand icon () to the right of the Attributes item.
The editor should now resemble Figure 17.
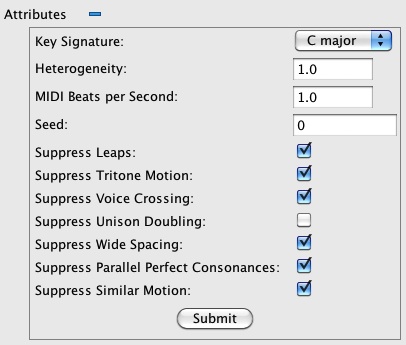
Figure 17: The document attributes panel.
The functions of the document attributes are explained above.
Accept all attribute defaults and use the hide/collapse icon () to hide the attributes panel.
Defining Chords and Tones
The next task it to create the repertory of Chords. To undertake this task you will need the Chord tables from the example description. Open this link under a separate browser tab.
Locate the Chords collection and click on the new-item icon ( ).
A New Chord dialog will appear.
Accept the default ID (1) but change the Name to “C Major”. Then click on
).
A New Chord dialog will appear.
Accept the default ID (1) but change the Name to “C Major”. Then click on ![]() .
Continue creating Chords using default id's and the names listed on the other browser tab.
When you're done, the display should resemble Figure 18:
Seven Chords in all, with id's ranging from 1 to 7.
Notice there's no Save option. Each time you create a new Chord,
the change will immediately be recorded in the underlying file.
.
Continue creating Chords using default id's and the names listed on the other browser tab.
When you're done, the display should resemble Figure 18:
Seven Chords in all, with id's ranging from 1 to 7.
Notice there's no Save option. Each time you create a new Chord,
the change will immediately be recorded in the underlying file.
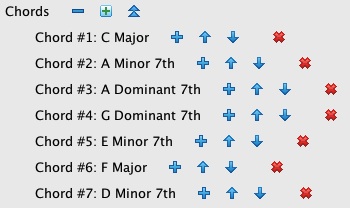
Figure 18: The Chords collection.
Now it's time to supply each Chord with a set of Tones. Expanding Chord #1: C Major
reveals two child items: Attributes and Tones.
Click on the new-item icon () to the right of Tones.
Set the degree to “C” and click on ![]() .
.
Continue adding Tones for degrees “E” and “G”. The display should resemble Figure 19.
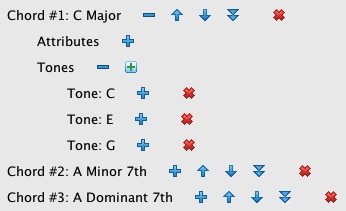
Figure 19: Tones in Chord #1: C Major.
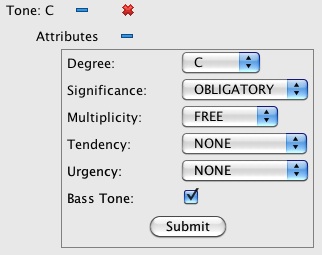
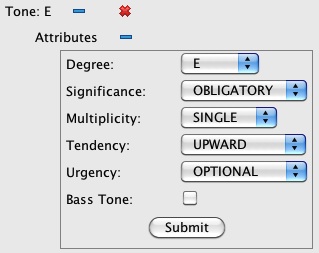
Fill in the Tone attributes as directed by Table 1-1 on the other browser panel. Figure 20 shows the attributes panels for all three “C Major” tones after the changes have been submitted.
 |
 |
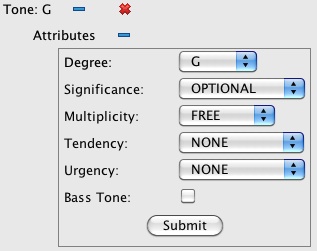 |
Figure 20: Tone attributes in Chord #1: C Major.
Continue creating Tones for Chords using the information in Table 1-2 through Table 1-7 in the other browser tab. Once you've specified Tones for all seven Chords, you can close the other browser tab.
Building the Parts Collection
Locate the Parts collection and click on the new-item icon ().
A New Part dialog will appear.
Accept the default ID (1) but change the Name to “Soprano”.
Then click on ![]() .
Continue creating Parts named &lquo;Alto”, “Tenor”, and “Bass”.
Accept the default ID in each instance.
When you're done, the display should resemble Figure 21.
.
Continue creating Parts named &lquo;Alto”, “Tenor”, and “Bass”.
Accept the default ID in each instance.
When you're done, the display should resemble Figure 21.
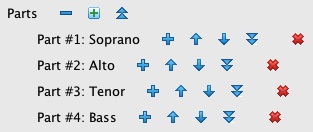
Figure 21: The Parts collection.
Fill in the part attributes as directed by the Parts table on the topic page. Figure 22 shows the attributes panels for all four Parts after the changes have been submitted.
 |
 |
 |
 |
Figure 22: Part attributes.
Building the Voicings Collection
Locate the Voicings collection and click on the new-item icon ().
A New Voicing dialog will appear.
Accept the default ID, then click on ![]() .
Continue creating Voices until you have created 9 in all.
When you're done, the display should resemble Figure 23.
.
Continue creating Voices until you have created 9 in all.
When you're done, the display should resemble Figure 23.
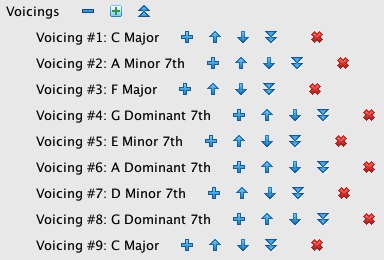
Figure 23: The Voicings collection with unmapped Chords.
Each of your Voicings needs to be mapped to a Chord. Expand Voicing #1 and its Attributes item. Do the same for Voicing #2. The display should now resemble Figure 24.
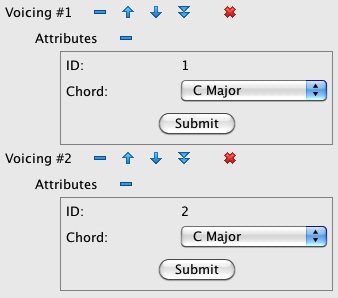
Figure 24: Voicing #1, Voicing #2, and their attributes with unmapped Chords.
Even though both attributes panels offer the “C Major” as the default Chord, both of
these Voicings have yet to be mapped. Click on ![]() for Voicing #1. The item name changes to Voicing #1: C Major, verifying that Voicing #1
is now mapped. Use the Chord drop-down for Voicing #2 to select “A Minor 7th”, then
click on
for Voicing #1. The item name changes to Voicing #1: C Major, verifying that Voicing #1
is now mapped. Use the Chord drop-down for Voicing #2 to select “A Minor 7th”, then
click on ![]() for Voicing #2.
The display should now resemble Figure 25.
for Voicing #2.
The display should now resemble Figure 25.
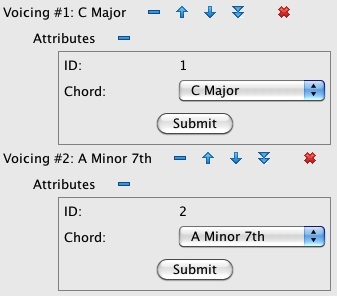
Figure 25: Voicing #1, Voicing #2, and their attributes with mapped Chords.
Continue mapping Voicings to Chords as directed by the Voicings table on the topic page. Collapse all attributes panels, then verify that the Voicings collection looks like Figure 26.
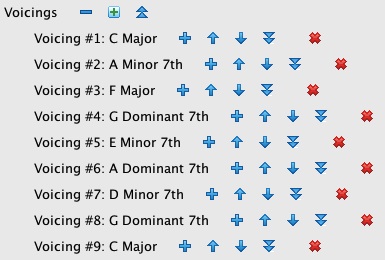
Figure 26: The Voicings collection with mapped Chords.
Checking Your Work
If the Animation tab is grayed out, click on click on ![]() to obtain a list of errors. Such errors usually involve components missing necessary child components. Fix them.
When the Animation tab becomes available, you are done creating
to obtain a list of errors. Such errors usually involve components missing necessary child components. Fix them.
When the Animation tab becomes available, you are done creating Partwriter-Example.xml.
| © Charles Ames | Page created: 2013-10-16 | Last updated: 2015-08-25 |