Rhythm-Generator Instructions
The Complementary Rhythm Generator Applet allows you to load a file describing a process, then watch the applet automatically generate rhythms. You can try designing scenarios on your own, though I don't really recommend it. In any case you should first check out the scenarios I have prepared. Since the applet's file chooser always starts with your home directory, and since you probably don't want to clutter up your home directory with XML files, I recommend that you establish a working folder directly under your home directory. A single working directory will suffice for all the applets on this site.
Version 1.0.4 of the demonstrating applet implements two enhancements relative to the preceding version 1.0.3.
The first enhancement is that the SHA-1 64-bit encrypted Java Signing Certificate has been upgraded to 128-bit
SHA-2 encryption, as required by the latest browsers.
The second enhancement is the establishment of an XML schema document, rhythm.xsd.
The version 1.0.4 file chooser now verifies that each compliant XML input file has a document element named
“document” with a schemaLocation attribute set to “https://charlesames.net/rhythm rhythm.xsd”.
If you wish to understand what is needed to bring a pre-1.0.4 file into compliance, use an online XML validation site such
as www.freeformatter.com.
Loading Scenario #1
The first prepared scenario is defined in the file Rhythm-Scenario01.xml.
Follow the instructions given in here to download Rhythm-Scenario01.xml into a working folder under your home directory.
- In Safari, right-click/control-click on the link and select Save Linked File As…
- In Firefox, right-click/control-click on the link and select Save Link As…
- In Internet Explorer, right-click on the link and select Save Target As…
In the Save As: dialog that follows, navigate to your working folder. Accept the filename and click on ![]() .
.
Initially, the applet should resemble Figure 1.
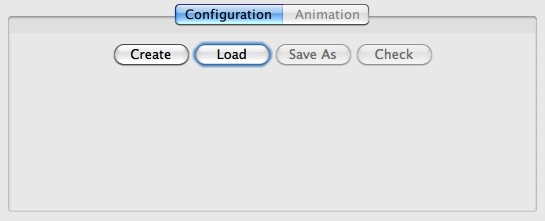
Figure 1: The applet without a file.
To load the file, click on ![]() and use the file chooser to locate
and use the file chooser to locate Rhythm-Scenario01.xml
in its download directory.
Once the file is successfully loaded, the applet will display the file path and the topmost component of the configuration scheme.
This new display is shown in Figure 2.
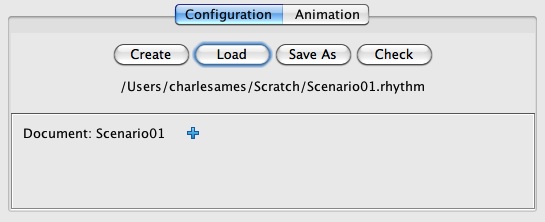
Figure 2: The applet after
Rhythm-Scenario01.xml has been loaded.
Viewing the Configuration
This portion of the instructions explains how to view the components of a Complementary Rhythm Generator file. If you have loaded a scenario and simply wish to experience the demonstration, you may skip ahead to Running Scenario #1.
We will now tour the graphical editor. Notice that this editor provides no Save or Undo buttons; any changes you make are written directly to the underlying file. That's the bad news. The good news is that if you inadvertently shut down the applet by browsing to another window, you can reload the file you were working on without losing data. You will be called upon to run this scenario shortly, so don't change any data for the moment.
Document Attributes
To the right of the Document: Scenario01 component is a show-content icon ( ).
Clicking on this icon reveals the child items shown in Figure 3.
Notice that the show/expand icon toggles to a hide/collapse icon (
).
Clicking on this icon reveals the child items shown in Figure 3.
Notice that the show/expand icon toggles to a hide/collapse icon ( ).
).
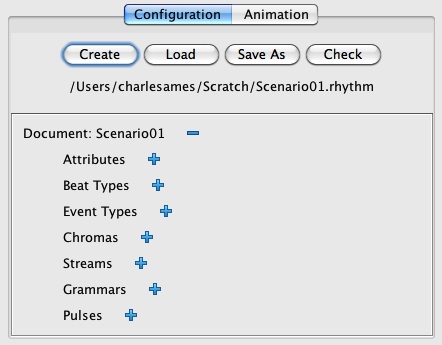
Figure 3: Expanding the Example component reveals seven child items.
Expand Attributes by clicking on the item's icon.
This action reveals the document-attribute editing panel pictured in Figure 4.
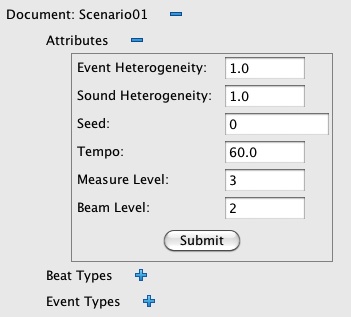
Figure 4: Expanding the Attributes component reveals an attribute-editing panel.
Attribute panels are the exception to the practice of saving changes immediately to file.
Within any attribute panel, you make whatever attribute changes you wish and then click on  .
The editor checks your choices.
Only if it agrees with these choices does the editor save the changed attribute values to file.
.
The editor checks your choices.
Only if it agrees with these choices does the editor save the changed attribute values to file.
The document attributes include:
- Event Heterogeneity — This value controls the amount of random leavening introduced into the event-type selection process. More poetically, it measures the bluntness of the knife-edge. When Heterogeneity is small, randomness intervenes only when available options would otherwise affect balance equally. Larger values permit selections to stray from optimal balance; however, the process makes up for such indiscretion in subsequent decisions.
- Sound Heterogeneity — This value controls the amount of random leavening introduced into the pitch-selection process.
- Tempo — The tempo, expressed in quarter notes per second.
- Seed — Each seed value causes the random number generator to produce a different sequence of random values. If you run an example twice with the same seed — everything else held equal — you'll get the same results.
- Measure Level — This attribute determines which Beat Types (see below) initiate new measures.
- Beam Level — This attribute determines which Beat Types (see below) initiate new beams.
Beat Types
Continue your tour by hiding () the attributes panel,
then expanding () the Beat Types collection.
The editor should now appear as pictured in Figure 5.
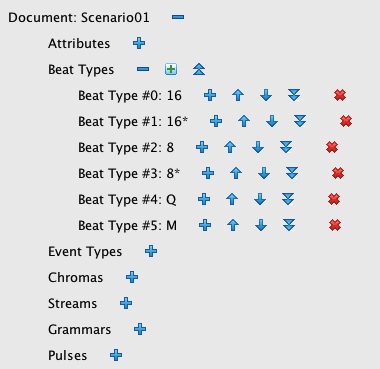
Figure 5: Expanding the Beat Types collection reveals a list of Beat Type items.
Six new control icons are revealed in Figure 5:
- Add new item.
- Resequence items.
- Shift item up.
- Shift item down.
- Push items down.
- Delete item.
Were just looking right now, so don't touch ANY of these. Instead, click on for Beat Type #0: 16.
Next, click on for the Attributes item.
The editor should now appear as pictured in Figure 6.
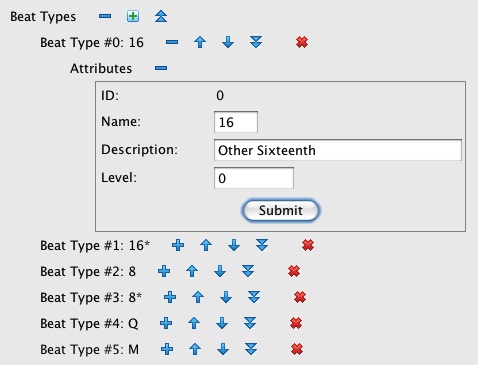
Figure 6: Attributes panel for Beat Type #0: 16.
Beat Type attributes include:
- ID — A unique integer ranging from 0 upwards.
- Name — A unique text string which appears on the grid display, and which should therefore be just a few characters.
- Description — A text string which explains the beat type more fully than the name. This description appears in the beat type legend and in Violation messages.
- Level — An integer representing the priority of the beat in the metric scheme. If the beat-type level equals or exceeds the document's Measure Level attribute, then the pulse should initiate a new measure. Otherwise not.
Event Types
Collapse () the Beat Type collection and expand () the
Event Type collection.
Next, reveal the attributes panel for Event Type #2: A.
The editor should now appear as pictured in Figure 7.

Figure 7: Expanding the Event Types collection reveals a list of Event Type items.
Each Event Type item has seven attributes:
- ID — A unique integer ranging from 0 upwards.
- Name — A unique text string which identifies the event type. The demonstrating applet uses icons rather than names to represent event types.
- Description — A text string which explains the event type more fully than the name. This description appears in the event type legend and in Violation messages.
- Color — The color used to distinguish event types in the graphic display.
-
Category — There are three categories:
- REST — Rests are indicated graphically using a gray disk (
 ).
). - TIE — Ties are indicated graphically using a bar icon (
 ).
). - ATTACK — Attacks are indicated graphically using a flag icon (
 ).
).
- REST — Rests are indicated graphically using a gray disk (
- Default for Category — This attribute is used by the imitation feature, which is not presently demonstrated in this attraction.
-
Bias — There are four bias options:
- NONE — No restrictions.
- LEADER — The current note may not be followed by a rest (or end-of-stream).
- TRAILER — The current event may not be preceded by a rest. TIE Event Types must always have the TRAILER bias.
- BOTH — The current note may not be either preceded or followed by a rest.
- NEITHER — The current note must both be preceded and followed by rests.
- Source Beat Types — This property only applies to ATTACK events. When this list is empty, this Event Type may be used on any Pulse. If the list has any members, then the Event Type may only be used on Pulses with the indicated beat types.
- Target Beat Types — This property only applies to ATTACK events. When this list is empty, notes initiated with this Event Type may terminate at any Pulse. If the list has any members, then notes initiated with this Event Type must terminate only at Pulses with the indicated beat types.
Chromas
Collapse () the Event Type collection and expand () the
Chromas collection. Next, reveal the attributes panel for Chroma #0.
The editor should now appear as pictured in Figure 8.
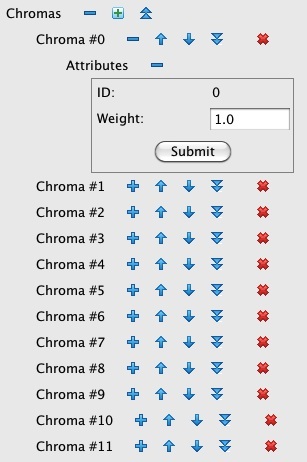
Figure 8: The expanded Chromas, collection, showing attributes for Chroma #0.
Figure 8 displays 12 Chroma instances, once for reach degree of the chromatic
scale. Each Chroma instance has ID and Weight instances. The weights
for Rhythm-Scenario01.xml are all set to unity.
Streams and Sounds
Collapse () the Chromas collection and expand () the
Streams collection. Next, reveal the attributes panel for Stream #1: Bells.
The editor should now appear as pictured in Figure 9.
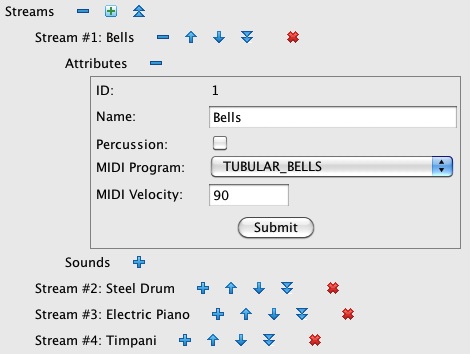
Figure 9: The expanded Streams collection, showing attributes for Stream #1: Bells.
Streams have five attributes:
- ID — A unique integer ranging from 1 upwards.
- Name — A unique text string.
- Percussion — A logical flag. Setting this flag true hides the MIDI Program attribute. Sounds played under this stream will be directed to MIDI channel 10, and the Sound attribute panel will display names of General Midi Percussion keys. Setting this flag false reveals the MIDI Program attribute. The Sound attribute panel will accept pitches expressed using letter names, accidentals, and octave numbers.
- MIDI Program This option is only visible when the Percussion flag is false. Each MIDI program is directed to a separate MIDI channel, excluding channel 10. You can therefore employ up to 15 distinct MIDI program values if you are industrious enough to define so many streams.
- MIDI Velocity — Ranges from 1 to 127. Defaults to 90 (forte).
Every Stream contains one or more Sounds. Figure 10 shows the Sounds for Stream #1: Bells. Sounds have three attributes:
- ID — An integer ranging from 1 upwards, which is unique under the Stream.
- Chroma — If you have two or more Sounds that should be treated as equivalent for balancing purposes, then these Sounds should share the same Chroma. Otherwise, each Sound should have its own Chroma.
- MIDI Key — If the Stream's Percussion flag is set, this attribute will present a drop down listing General MIDI Percussion sounds. Otherwise, this attribute presents a text field. You enter a pitch using a letter name, accident, and octave number.
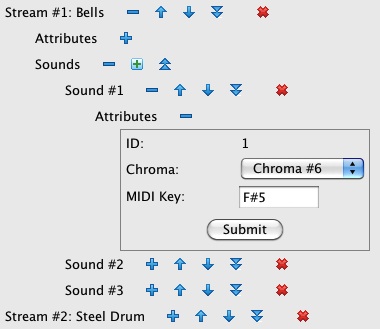
Figure 10: The Sounds collection for Stream #1: Bells, showing attributes for Sound #1.
Grammars
Figure 11 shows the two event-type nominating grammars for Scenario #1. Grammar #1: Cadence applies only to the final Pulse in the scenario; all other Pulses reference Grammar #2: Content.

Figure 11: The expanded Grammars collection, showing attributes for each item.
Grammars provide instructions for nominating Event Types for cells in the stream/pulse grid. Every Grammar starts with a “Root” group, such as the one shown for Grammar #2: Content in Figure 12. Each Member defined under the “Root” group can be either a Group implementing a fresh decision-making tier or a Stream reference. As Figure 12 shows, the Members for Scenario #1 all reference Streams.
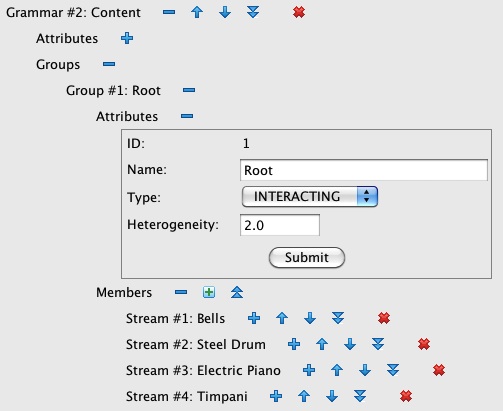
Figure 12: Root group for Grammar #2: Content, including attributes panel and Members collection.
In Scenario #1's single-tier content grammar, nominating an Event Type involves drilling down first to the Member associated with the current Stream, and next to the item referencing the current pulse's Beat Type. Each Beat Type item contains the subcollection of Event Type productions which will be nominated in the current circumstance. Figure 13 shows this drill down for Beat Type and Stream #1: Bells and Beat Type #5: M. In this circumstance the only appropriate Event Type is “Attack” which production has unit weight.
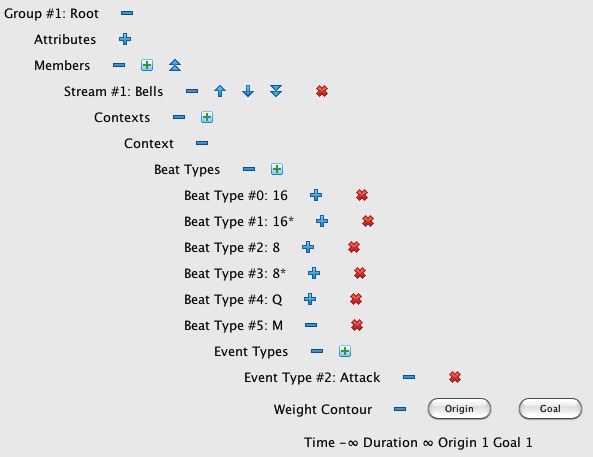
Figure 13: Drill-down in Grammar #2: Content from Stream #1: Bells through Beat Type #5: M and Event Type #2: Attack to the Weight Contour.
Pulses
The Pulses collection defines the metric framework for the scenario. Figure 14 shows the first few Pulses for Scenario #1. Each pulse references a Duration, a Beat Type, and a Grammar.
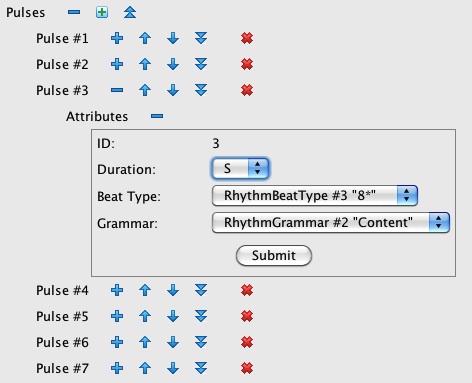
Figure 14: The first seven Pulse items, showing attributes for Pulse #3.
This completes your tour. Please hide everything but the top-level Document.
Running Scenario #1
The viewer/editor toured in the previous section is embedded within the first
of two tabbed panels named Configuration and Animation.
The Animation panel was initially grayed out (see Figure 1)
but came active immediately after Rhythm-Scenario01.xml was loaded (see Figure 2).
However, the Animation panel only became active because the applet verified
that all the components in Rhythm-Scenario01.xml were properly defined.
Now is the time to click on the tab named Animation.
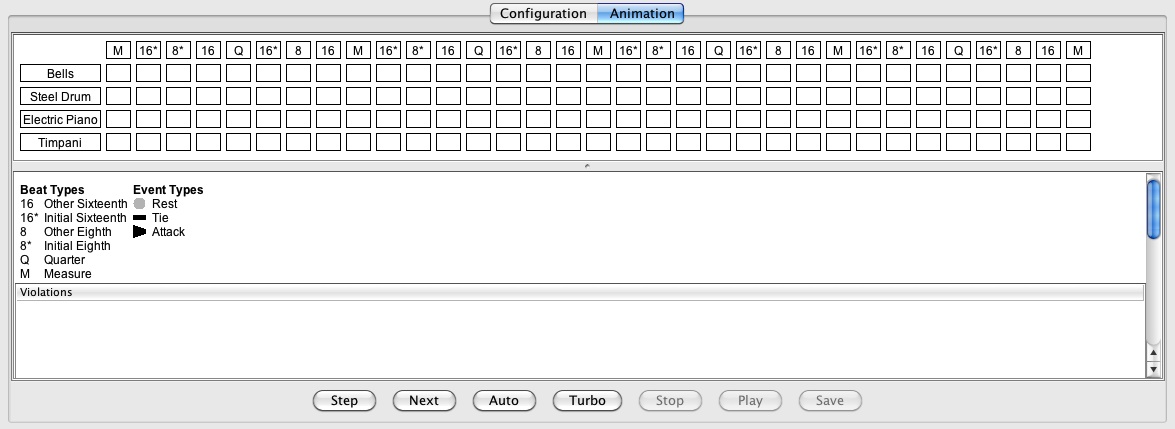
Figure 15: The initial Animation panel for
Rhythm-Scenario01.xml.
The Animation panel pictured in Figure 15 splits into an upper panel showing the Stream/Pulse grid, a middle panel showing the current status, and a lower panel listing Violations. Beneath the Violations list lie six buttons. The first four of these buttons control the animation:
| Evaluate the next pitch option. | |
| Complete selecting pitches for the current Pulse. | |
| Complete the entire voice-leading exercise at leisurely speed. | |
| Complete the entire voice-leading exercise at high speed. | |
| Interrupt auto/turbo-selection. |
The goal of the animation is to choose an Event Type for cell of the Stream/Pulse grid.
Clicking on ![]() displays individual Event Types as they are being considered.
Figure 11 shows what the applet presents to me after clicking once on
displays individual Event Types as they are being considered.
Figure 11 shows what the applet presents to me after clicking once on ![]() .
.
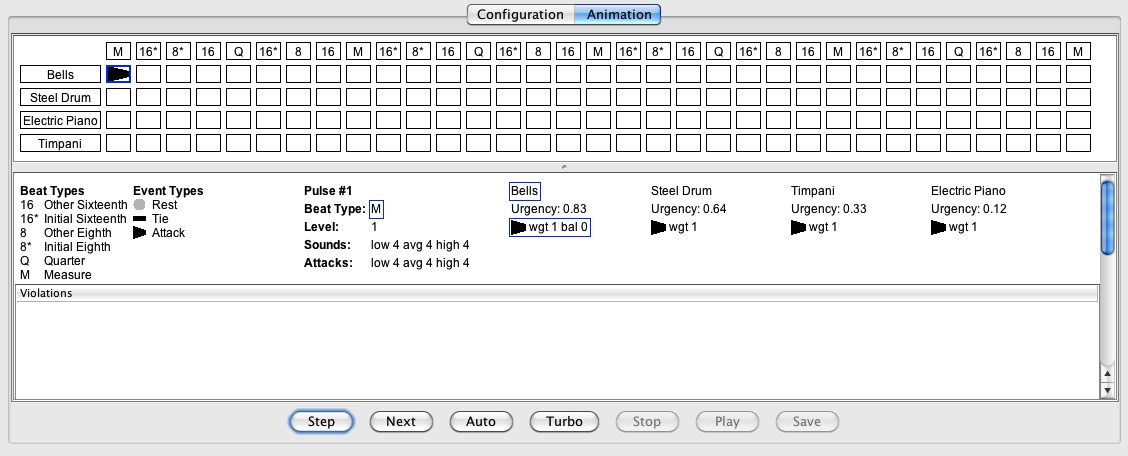
Figure 11: Evaluating the first (and only) Event Type for Stream #1: Bells under Pulse #1.
The blue border around the upper left cell of the grid in Figure 11indicates that the rhythm generator is currently considering Event Types for the Bells stream under Pulse #1.
The status panel in Figure 11 informs us that the event engine is working on Pulse #1 whose Beat Type is “M”. The three Attacks values reflect the fact that all four streams initiate attacks when the Beat Type is “M”. Likewise for the Sounds values, which limit the total of attacks plus ties for Pulse #1.
The status panel further informs us that the event engine has elected to compose the events under Pulse #1 in the stream sequence Bells, Steel Drum, Timpani, Electric Piano. The the order of stream consideration is determined by Urgency value listed underneath each stream name. Underneath this Urgency value is a list of Event Types nominated for the stream.
The blue rectangle surrounding Bells confirms that this is the stream currently being processed.
Only one Event Type option is available for consideration: (Attack), and
the blue rectangle around the icon indicates that this is the option being considered.
The fact that no Violations are listed means that this option passes muster, therefore the rhythm generator may
freely advance to the Steel Drum stream.
Click several times on ![]() . You will notice that there is always exactly one
option available to each decision. That is the nature of
. You will notice that there is always exactly one
option available to each decision. That is the nature of Rhythm-Scenario01.xml.
Now try clicking on ![]() . The rhythm generator works through all of the streams
in each pulse before stopping.
. The rhythm generator works through all of the streams
in each pulse before stopping.
Finally, click on ![]() to animate the remainder of the rhythm-generating run
at a leisurely rate. (For a faster rate, use
to animate the remainder of the rhythm-generating run
at a leisurely rate. (For a faster rate, use ![]() .)
The completed display appears in Figure 12.
.)
The completed display appears in Figure 12.
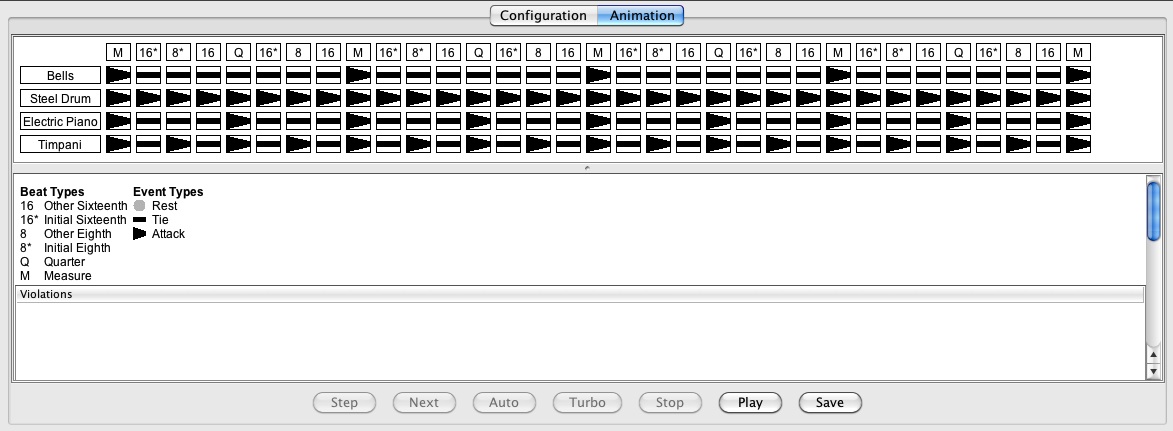
Figure 12: Graphic display for the
Rhythm-Scenario01.xml example after the
rhythm-generating run has completed.
Notice that the animation-controlling buttons are all grayed out but that two other buttons have now come active:
Click on ![]() to hear a MIDI rendition of the example.
Click on
to hear a MIDI rendition of the example.
Click on ![]() to save a MIDI rendition of the example to a file named
to save a MIDI rendition of the example to a file named Scenario01.midi.
To clear the display panel and re-experience the same solution, toggle back and forth between the Configuration and Animation tabs. To obtain a different solution, you must change the Seed value in the document Attributes panel.
Building Your Own Scenario #3
This portion of the instructions explains how to create the Rhythm-Scenario03.xml example from scratch.
This scenario is explained on the topic page.
You need to read that explanation before you undertake the procedures described here.
It will be helpful, but not required, to have read Viewing the Configuration.
Full disclaimer: I created all of the scenario files provided with this attraction using Java programs. This eliminated a lot of tedium, especially where all four streams used identical Event Type productions. I personally used the graphic editor for the first time while preparing these instructions, so I can attest that the functionality works. Much tedium would be eliminated if the graphic editor implemented copy-and-paste features. If you desire such, contact me using the email address given on the Home Page.
Scenario #3 was chosen in favor of Scenario #1 because Scenario #3 demonstrates tiered grammars which are not limited
to Hobson's choice.
Make sure you're viewing the Configuration panel.
To create a new file, click on ![]() .
Use the file chooser to locate your working directory and name the file
.
Use the file chooser to locate your working directory and name the file Rhythm-Scenario03.xml.
If a file with the same name already exists, overwrite it. (You can always re-download the original.)
The editor should now resemble Figure 15.
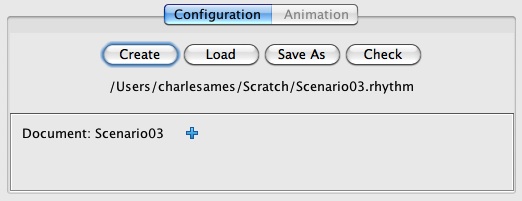
Figure 15: The newly created
Rhythm-Scenario01.xml example.
Document Attributes
Notice the icon, located just right of the Document: Scenario03 component.
This is the show/expand icon. Click on it.
The editor should now resemble Figure 16.
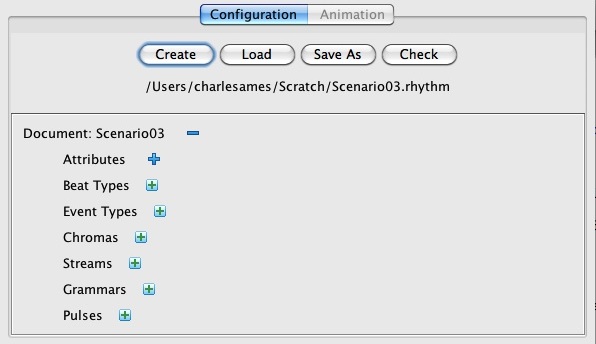
Figure 16: Components of the Example item.
The first thing to do is select document attributes.
To reveal the document attributes panel, click on the the show/expand icon () to the right of the Attributes item.
The editor should now resemble Figure 17.
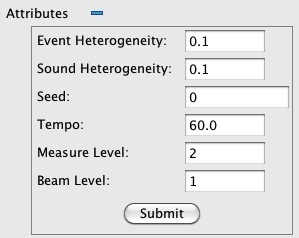
Figure 17: The initial document attributes panel.
The purposes of the document attributes are explained above.
Change both Event Heterogeneity and Sound Heterogeneity to 1.0.
Change the Measure Level to 3 and the Beat Level to 2.
Click on ![]() to save your changes.
to save your changes.
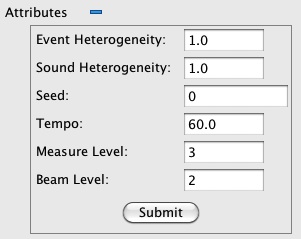
Figure 18: The document attributes panel, modified.
The attributes panel should now resemble Figure 18.
Use the hide/collapse icon () to hide these document attributes.
Defining Beat Types
The next task it to create the repertory of Beat Types. To undertake this task you will need the Beat Types table from the topic page. Open this link under a separate browser tab.
Locate the Beat Types collection and click on the new-item icon ( ).
A New Beat Type dialog will appear.
Accept the default ID (1) but change the Name to “16”.
Then click on
).
A New Beat Type dialog will appear.
Accept the default ID (1) but change the Name to “16”.
Then click on ![]() .
Continue creating Beat Types using default id's and the names listed on the other browser tab.
When you're done, the display should resemble Figure 19:
Six Beat Types in all, with id's ranging from 1 to 7.
Notice there's no Save option. Each time you create a new Beat Type,
the change will immediately be recorded in the underlying file.
.
Continue creating Beat Types using default id's and the names listed on the other browser tab.
When you're done, the display should resemble Figure 19:
Six Beat Types in all, with id's ranging from 1 to 7.
Notice there's no Save option. Each time you create a new Beat Type,
the change will immediately be recorded in the underlying file.
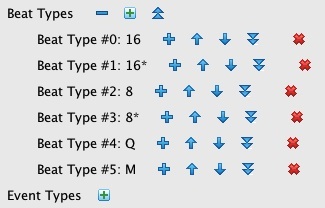
Figure 19: The Beat Types collection.
Now it's time to fill in Beat Type attributes. Expand Beat Type #0: 16
to reveal its child Attributes item, then expand Attributes.
Set the Description to “Other Sixteenth”, leave the Level at 0,
then click on ![]() . The panel should now resemble Figure 20.
. The panel should now resemble Figure 20.
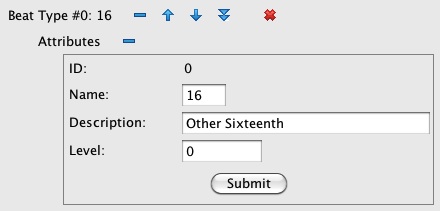
Figure 20: Attributes for Beat Type #0: 16.
Fill in the Description and Level for each remaining
Beat Type using descriptions and the levels listed on the other browser tab.
Remember to click on ![]() each time.
Finally collapse the Beat Type collection and close the browser window
listing Beat Types.
each time.
Finally collapse the Beat Type collection and close the browser window
listing Beat Types.
Defining Event Types
The next task it to create the repertory of Event Types. Event types for Scenario #3 are detailed in Table 14 on the topic page.
The Event Types collection is somewhat confusing because the Event Type names are not actually used in the animation display and since items within the collection display Event Type descriptions (intially blank) rather than Event Type names.
Locate the Event Types collection and click on the new-item icon ().
A New Event Type dialog will appear.
Accept the default ID (0) but change the Mode to “REST”
and the Name to “R”.
Then click on ![]() .
Continue creating Event Types named &lquo;-” with mode “TIE”,
“A” with mode “ATTACK”,
“S” with mode “ATTACK”,
“I” with mode “ATTACK”,
“Q” with mode “ATTACK”,
and “H” with mode “ATTACK”.
Accept the default ID in each instance.
When you're done, the display should resemble Figure 21.
.
Continue creating Event Types named &lquo;-” with mode “TIE”,
“A” with mode “ATTACK”,
“S” with mode “ATTACK”,
“I” with mode “ATTACK”,
“Q” with mode “ATTACK”,
and “H” with mode “ATTACK”.
Accept the default ID in each instance.
When you're done, the display should resemble Figure 21.
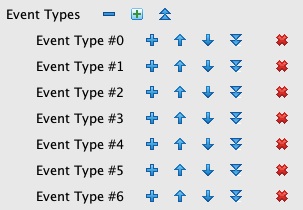
Figure 21: The Event Types collection — attributes left to be specified.
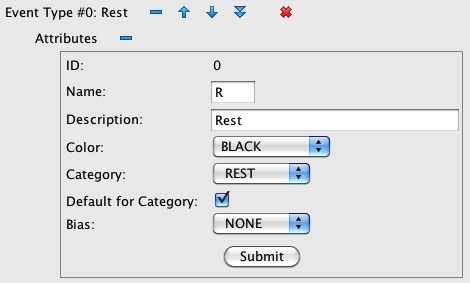
There are three basic event types and four meta event types. Attribute panels for the basic event types appear in Figure 22. All have Default for Category checked.
 |
 |
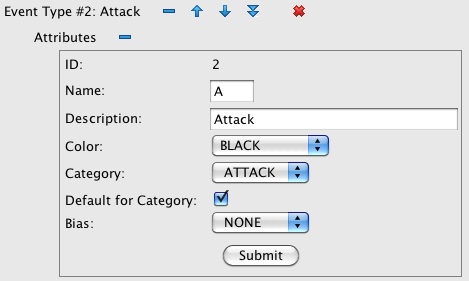 |
Figure 22: Basic Event Type attributes.
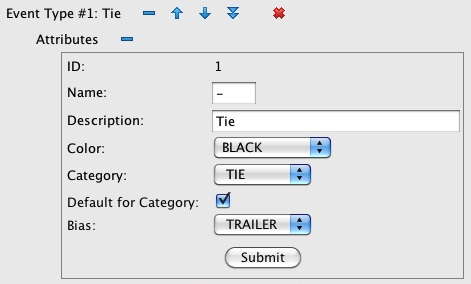
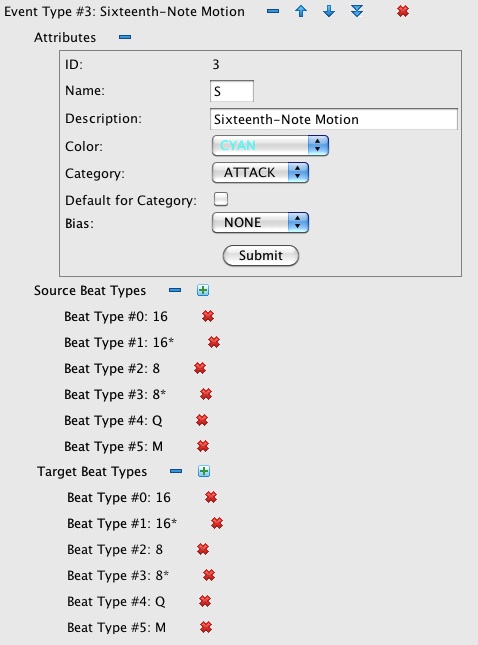
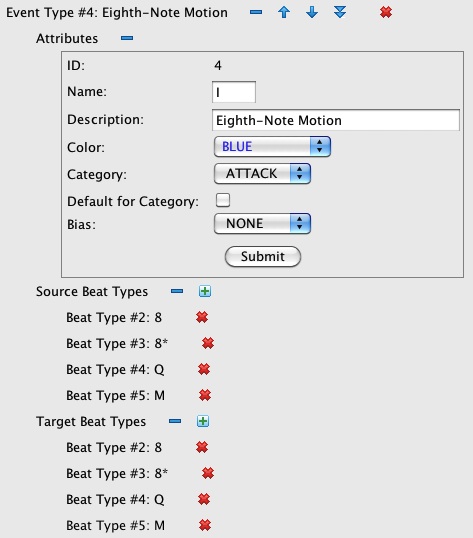
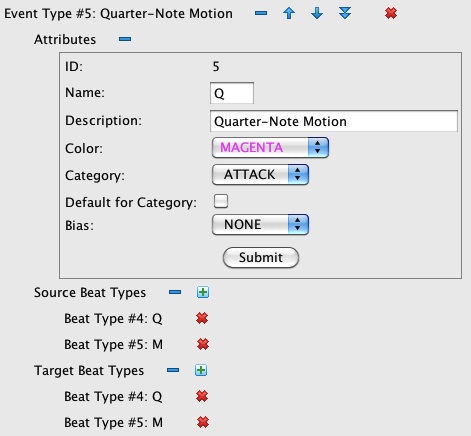
Attribute panels for the meta event types appear in Figure 23.
All have Default for Category unchecked.
Each meta type lists references in its Source Beat Types and Target Beat Types
collections. To reference a Beat Type, click on the collection.s new-item icon ().
A New Beat Type Reference dialog will appear. Use the drop-down to select the Beat Types
reference you wish to include, the click on ![]() .
.
 |
 |
 |
 |
Figure 23: Meta Event Type attributes.
Complete the Event Type attributes as indicated in Figure 22 and Figure 23.
Finally, collapse () the Event Types collection.
Building the Chromas Collection
The Chromas collection should have six members, each with unit weight.
Locate the Chromas collection and click on the new-item icon ().
A New Chroma dialog will appear.
Accept the default ID (0) and click on ![]() .
Repeat these steps until the Chromas collection has six members with id's ranging from 0 to 5.
When you're done, the display should resemble Figure 24.
.
Repeat these steps until the Chromas collection has six members with id's ranging from 0 to 5.
When you're done, the display should resemble Figure 24.
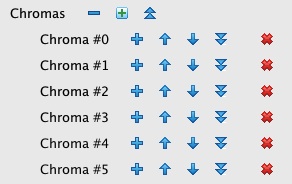
Figure 24: The Chromas collection.
Weight is the sole Chroma attribute.
You can verify that each new Weight defaults to unity by revealing the attributes
panel of any Chroma just created. Wrap up this step by collapsing ()
the Chromas collection.
Streams and Streams
The Streams collection should have four members named “Cowbell”, “Claves”, “Clap”, and “Toms”.
Locate the Streams collection and click on the new-item icon ().
A New Stream dialog will appear.
Accept the default ID (1) but change the Name to “Cowbell”.
Click on ![]() .
Repeat these steps for “Claves”, “Clap”, and “Toms”.
When you're done, the display should resemble Figure 25.
.
Repeat these steps for “Claves”, “Clap”, and “Toms”.
When you're done, the display should resemble Figure 25.
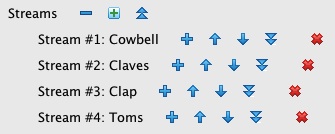
Figure 25: The Streams collection.
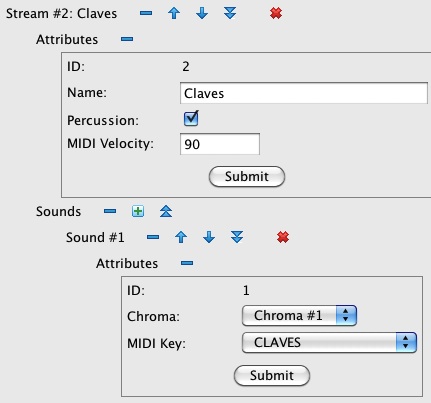
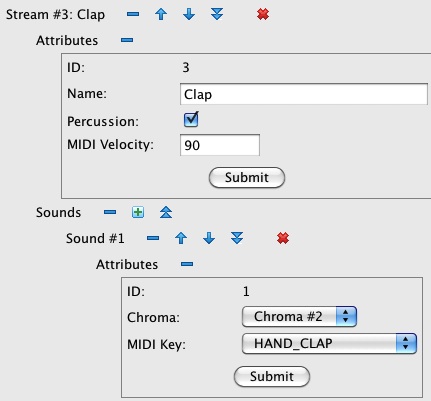
Figure 26 displays the Stream and Sound attributes. All four Streams have their Percussion box checked. The “Cowbell”, “Claves”, and “Clap” Streams each have only one Sound, while the “Toms” Stream has three Sounds.
 |
 |
 |
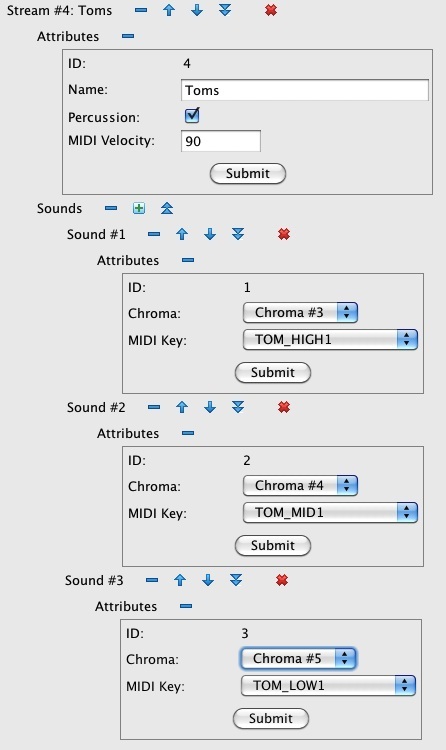 |
Figure 26: Stream and Sound attributes.
Fill in the indicated Stream attributes, then add the indicated Sounds.
Finally, collapse () the Streams collection
The Grammars Collection
The Grammars collection should have two members named “Cadence”, and “Content”.
Locate the Grammars collection and click on the new-item icon ().
A New Grammar dialog will appear.
Accept the default ID (1) but change the Name to “Cadence”.
Click on ![]() .
Repeat this step to create a second Grammars named “Content” with ID 2.
When you're done, the display should resemble Figure 27.
.
Repeat this step to create a second Grammars named “Content” with ID 2.
When you're done, the display should resemble Figure 27.
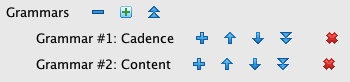
Figure 27: The Grammars collection.
Building the “Cadence” Grammar
We begin by creating the “Cadence” grammar, whose productions are described in Table 5 of the topic page.
Every Grammar has a “Root” group item beneath which the top-tier productions are defined.
Reveal the attributes panel for this “Root” item by expanding in turn, Grammar #1: Cadence,
Groups, Group #1: Root and Attributes.
Change the “Root” item's Group Type from “INDEPENDENT” to “INTERACTING”
and click on ![]() .
The display should now resemble Figure 28.
.
The display should now resemble Figure 28.
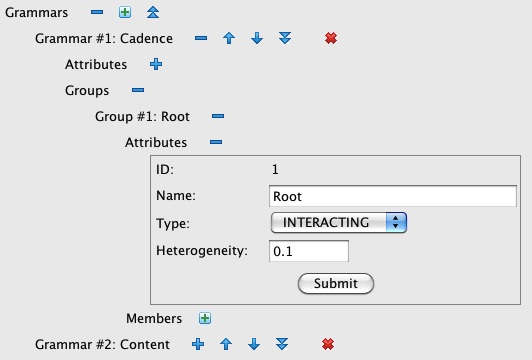
Figure 28: The attributes panel and unpopulated root Members collection for Grammar #1: Cadence.
The “Root” Members collection should have one member for each Stream in Scenario #3.
To add the first member, hide the attributes panel, then click on the new-item icon () for Members.
A New Member dialog will appear.
Set the Mode to “Stream”.
Accept the default ID (1) and make sure “Cowbell” is selected in the Stream drop-down.
Click on ![]() .
Repeat this step for each remaining Stream: “Claves” with ID 2,
“Clap” with ID 3, and “Toms” with ID 4.
When you're done, the display should resemble Figure 29.
.
Repeat this step for each remaining Stream: “Claves” with ID 2,
“Clap” with ID 3, and “Toms” with ID 4.
When you're done, the display should resemble Figure 29.
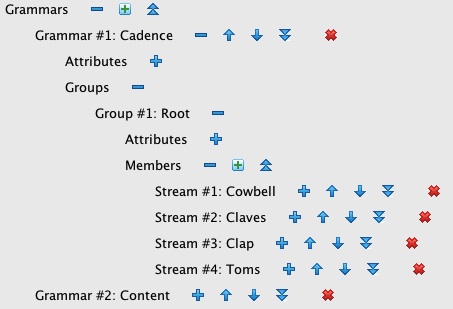
Figure 29: The populated root Members collection for Grammar #1: Cadence.
Drill down from Stream #1: Cowbell to the Beat Types collection by expanding in turn, Stream #1: Cowbell, Contexts, and Context. The display should resemble Figure 30. Notice that Group #1: Root has no Contexts collection. The Stream #1: Cowbell member has such a collection, but as a first-tier item it contains just one unnamed Context — you cannot add any others. It is only at the second tier and below that one finds multiple Contexts referencing specific Event Types.
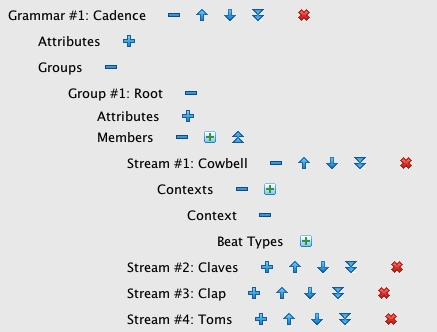
Figure 30: The unpopulated Beat Types collection for root member Stream #1: Cowbell of Grammar #1: Cadence.
This collection reference every Beat Type in Scenario #3.
To add the first reference, click on the new-item icon ().
A New Beat Type Reference dialog will appear.
Make sure “BeatType #0: 16” is selected in the Reference drop-down.
Click on ![]() .
Repeat this step for each remaining Beat Type.
When you're done, the display should resemble Figure 31.
.
Repeat this step for each remaining Beat Type.
When you're done, the display should resemble Figure 31.
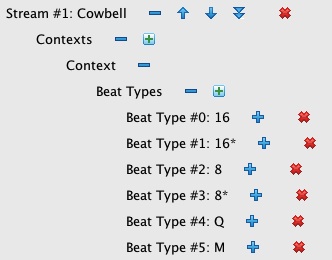
Figure 31: The populated Beat Types collection for root member Stream #1: Cowbell of Grammar #1: Cadence.
According to Table 5 on the topic page, Beat Types “16”, “16*” “8”, “8*”, and “Q” should produce Event Type “Tie” while Beat Type “M” should produce Event Type “Attack”.
To add an Event Type production to Beat Type “16”, first expand Beat Type #0: 16 to reveal its child Event Types collection (see Figure 32),
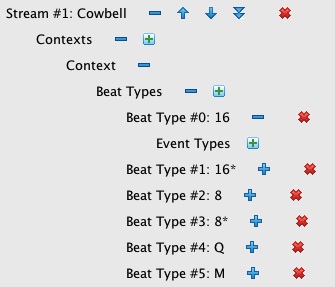
Figure 32: The unpopulated Event Types collection for Beat Type #0: 16 under root member Stream #1: Cowbell of Grammar #1: Cadence.
Click on the new-item icon ().
A New Event Type Reference dialog will appear.
Make sure “EventType #1: 16” is selected in the Reference drop-down.
Click on ![]() .
Repeat this step, adding the appropriate Event Type reference to each remaining Beat Type.
When you're done, the display should resemble Figure 33 except in two particulars:
I have expanded Event Type #1: Tie under Beat Type #0: 16 and
Event Type #2: Attack under Beat Type #5: M to reveal the weight contours
of these two Event Type productions.
.
Repeat this step, adding the appropriate Event Type reference to each remaining Beat Type.
When you're done, the display should resemble Figure 33 except in two particulars:
I have expanded Event Type #1: Tie under Beat Type #0: 16 and
Event Type #2: Attack under Beat Type #5: M to reveal the weight contours
of these two Event Type productions.
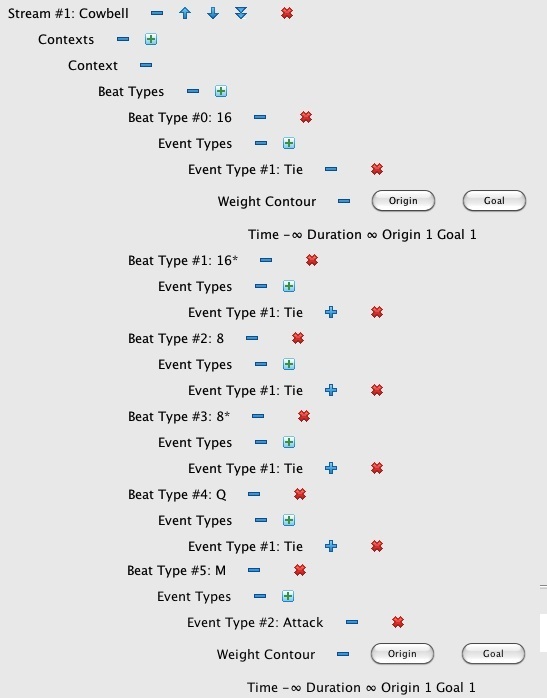
Figure 33: The populated Event Types collections for all Beat Types under root member Stream #1: Cowbell of Grammar #1: Cadence.
Notice Event Types production weights are capable of evolving over time. Although this feature seemed slick when I was implementingit, I have not yet personally exploited this feature, and probably will never do so. For now, let us just take Figure 33 as confirmation that Event Types weights default to unity. We'll deal with non-uniform weights in connection with Grammar #2: Content.
Repeat the steps just described for Stream #1: Cowbell for the remaining root members, Stream #2: Claves, Stream #3: Clap, and Stream #4: Toms.
Building the “Content” Grammar
The “Content” grammar for scenario #3 has two tiers. The two tiers are detailed by two tables on the topic page. For the upper tier, see Table 15. For the lower tier, see Table 16. Figure 34 shows the tiered structure of Grammar #2: Content.
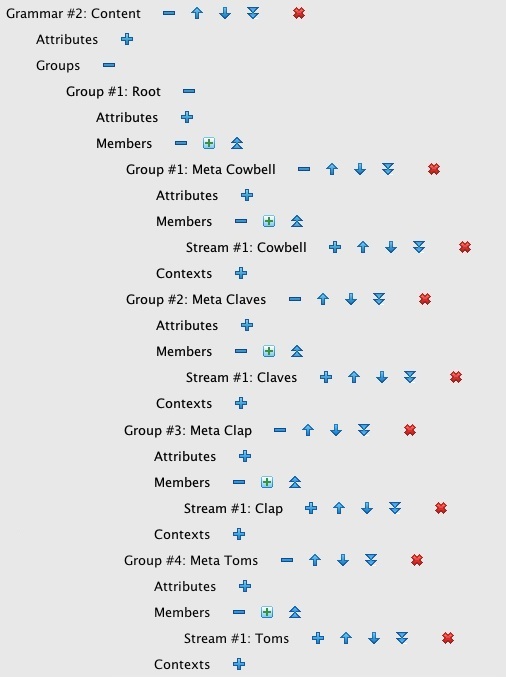
Figure 34: The root members under Grammar #2: Content are Group items, each containing one Stream item.
Since most Grammar editing features were explained previously in connection to “Cadence”, I'm going to power through this second grammar.
- To start, follow the previous instructions for changing the Type attribute for Group #1: Root from “INDEPENDENT” to “INTERACTING”. Use this opportunity to change the Heterogenity attribute from “0.1” to “2.0”. It is important to make the Heterogenity change now, since the value cascades to Member items as they are created.
- Next, use the New Member dialog with “Group” Mode to create first-tier items named “Meta Cowbell”, “Meta Claves”, “Meta Clap”, and “Meta Toms”.
- Use the attributes panel for each new Member to change the Type from “INDEPENDENT” to “INTERACTING”. Verify that the Heterogenity for each new Member is “2.0”. Collapse all attribute panels.
- Go to the Members collection for Group #1: Meta Cowbell. Use the New Member dialog with “Stream” Mode to create one second-tier item referencing Stream #1: Cowbell.
- Repeat the preceding step for the “Meta Claves”, “Meta Clap”, and “Meta Toms” groups, substituting Stream references as appropriate.
The display should now resemble Figure 34.
Drill down to the Beat Types collection for Group #1: Meta Cowbell by expanding Group #1: Meta Cowbell, Contexts, Context, and Beat Types follow the instructions to fill this list with references to every Beat Type defined for this scenario. The display should now resemble Figure 35.
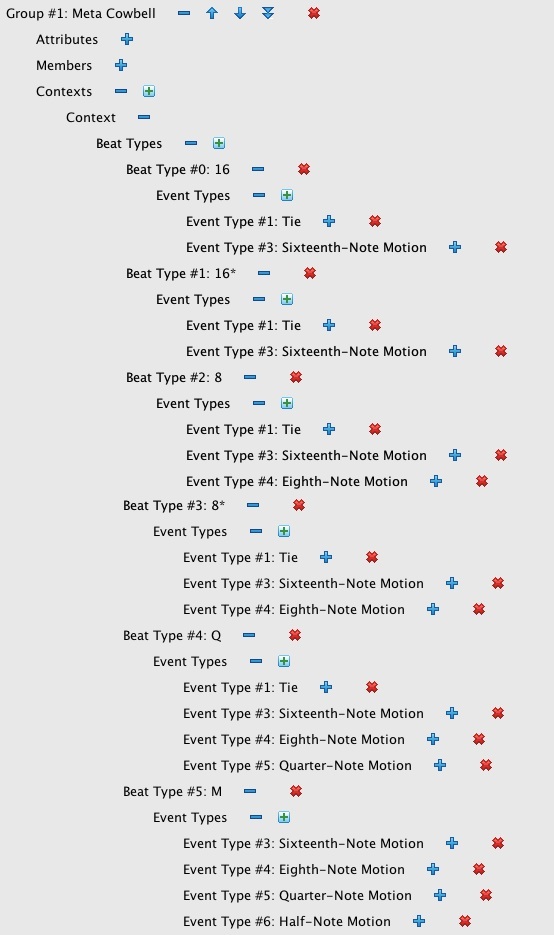
Figure 35: The populated Beat Types collection for root member Group #1: Meta Cowbell of Grammar #2: Content, showing weight contours for Event Type “16”.
Reference Table 15 from the topic page to determine that the event type productions should be “Sixteenth-Note Motion” with weight 1 and “Tie” with weight 3. Expand Beat Type #0: 16 and use the New Event Type dialog to create productions for “Event Type #3: S” (sixteenth-note motion) and “Event Type #1: -” (tie). Expand the weight contours of each new production.
By default, both weight contours shown in Figure 35 sustain constant unit values. However, the weight for
“Tie” is supposed to be 3.
To make this change, locate the weight contour for Event Type #1: Tie and
click on the ![]() .
A Weight Origin dialog will appear.
Accept the default time of negative infinity (-∞) but change the Origin to 3.
Click on
.
A Weight Origin dialog will appear.
Accept the default time of negative infinity (-∞) but change the Origin to 3.
Click on ![]()
Continue adding event type productions as per Table 15 from the topic page. Figure 36 shows all Beat Type/Event Type combinations. Be sure to change the weight for Event Type #1: Tie under Beat Type #1: 16* to 3, and the weights for Event Type #1: Tie under Beat Type #2: 8 and Beat Type #3: 8* to 2.
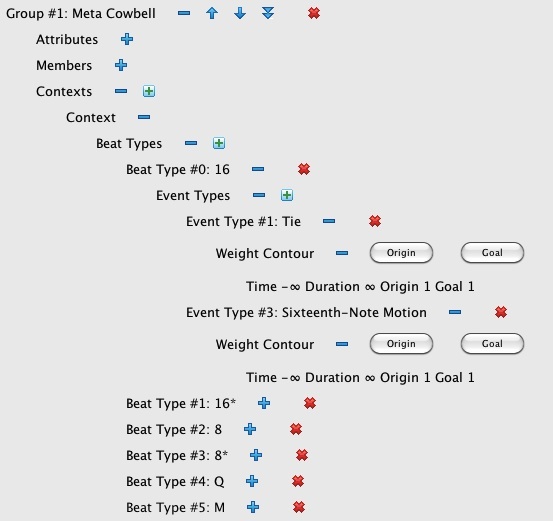
Figure 36: The populated Beat Types collection and Event Types subcollections for root member Group #1: Meta Cowbell of Grammar #2: Content.
This concludes the context productions for Group #1: Meta Cowbell. Replicate these context productions for the three other “Meta” groups.
Now for the second tier. Collapse all items under the four “Meta” groups, then drill down to the Contexts collection for Stream #1: Cowbell by expanding in turn Group #1: Meta Cowbell, Members, and Stream #1: Cowbell.
-
Use the the new-item icon () to add contexts referencing Event Types
“S” (Sixteenth-Note Motion),
“I” (Eighth-Note Motion), “Q” (Quarter-Note Motion), and “H” (Half-Note Motion).
- Fill the Beat Types collection for each context just created with references to every Beat Type defined in this scenario.
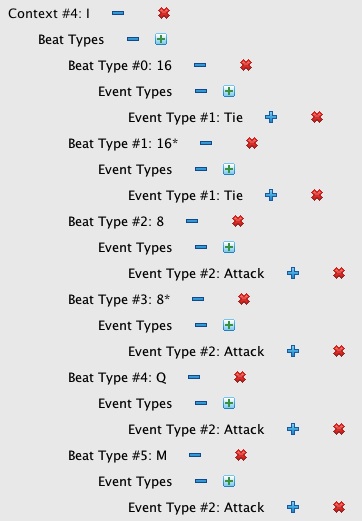
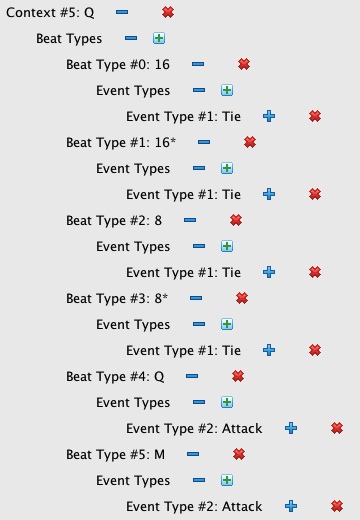
- Fill in the Event Types subcollection under each Beat Type reference just created as per Table 16 from the topic page. (Where the Context Event Type icon in this table shows a tie, this indicates that the context is inferred from the initiating attack.) When you're done your Event Type subcollections should match Figure 37. Since the table indicates that all event type productions have unit weight, you don't need to bother about weights.
- Replicate these context productions for Stream #2: Claves, Stream #3: Clap, and Stream #4: Toms.
 |
 |
 |
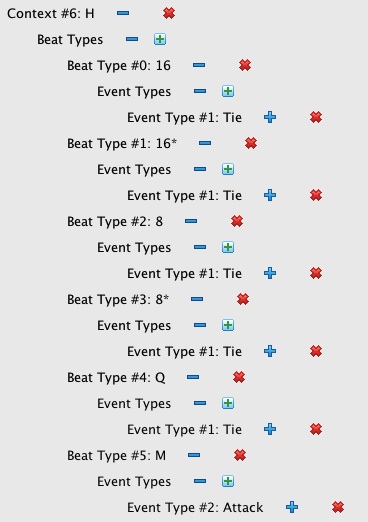 |
Figure 37: Contexts for Stream #1: Cowbell.
You're finally done building the Grammars collection. Collapse () all items
under this collection.
Building the Pulses Collection
Locate the Pulses collection and click on the new-item icon ().
A New Pulse dialog will appear.
Accept the default ID (0) and click on ![]() .
Repeat these steps until the Pulses collection has 33 members with id's ranging from 1 to 33.
.
Repeat these steps until the Pulses collection has 33 members with id's ranging from 1 to 33.
To fill in pulse attributes you will need the metric framework table from the topic page. Open this link under a separate browser tab. Expand the attributes panel for each Pulse and configure these as indicated in the table. Figure 38 shows the completed attributes panel for Pulse #1. Pulses 1-32 should all reference “RhythmGrammar #2: Content”.
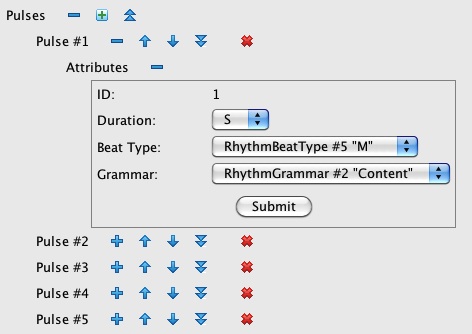
Figure 38: The Pulses collection, showing attributes for Pulse #1.
As Figure 38 shows, the final Pulse #33 should have Duration “H”, referencing “RhythmBeatType #1: M” and “RhythmGrammar #1: Cadence”
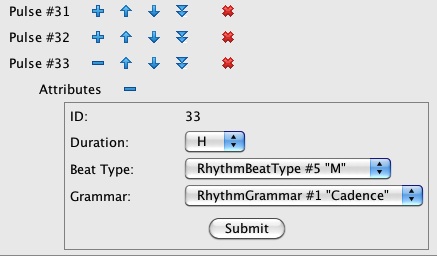
Figure 39: The Pulses collection, showing attributes for Pulse #33.
Checking Your Work
If the Animation tab is grayed out, click on click on ![]() to obtain a list of errors. Such errors usually involve components missing necessary child components. Fix them.
When the Animation tab becomes available, you are done creating
to obtain a list of errors. Such errors usually involve components missing necessary child components. Fix them.
When the Animation tab becomes available, you are done creating Rhythm-Scenario03.xml.
| © Charles Ames | Page created: 2013-12-05 | Last updated: 2015-08-25 |